

How to Choose Essential Tools for Home Coffee Cupping
Last Updated: November 2, 2026
Quick Summary
The essential tools for home coffee cupping are a burr grinder, a digital scale, a gooseneck kettle, matching porcelain bowls, and a cupping spoon. Get those five right and you remove the variables that distort your sensory analysis, so your scores reflect the coffee rather than your setup.
- A burr grinder is the most important purchase because uniform particles extract evenly.
- Use 8.25 grams of coffee to 150 milliliters of water as your fixed reference ratio.
- Grind to a medium setting, roughly the texture of coarse sand, just before brewing.
- Wait four minutes before breaking the crust, stirring three times and skimming the foam.
- Taste at hot, warm, and cool points because sweetness and acidity emerge as the cup cools.
Table of Contents
- Why the Right Tools Make Home Coffee Cupping Worth Doing
- The Essential Coffee Cupping Equipment List
- Coffee Cupping Protocol: A Step-by-Step Walkthrough
- Nailing the Coffee Cupping Ratio and Grind
- Timing Your Coffee Cupping Time for Best Results
- How to Read a Coffee Cupping Chart
- Budget-Friendly DIY Alternatives and Troubleshooting Common Errors
- Stock Your Cupping Table with Brewtiful Coffee
- Frequently Asked Questions
Why the Right Tools Make Home Coffee Cupping Worth Doing
Coffee cupping is the standardized method roasters and buyers use to evaluate coffee, and it's the fastest way to train your palate at home.
Here's the part most guides get wrong. They hand you a shopping list and skip the why. But tools shape results. A dull blade grinder throws off your grind consistency, and inconsistent grounds extract unevenly, which means your tasting notes describe the grinder, not the coffee.
The good news: you don't need much. Below, we'll walk through exactly what to buy, how to run a full coffee cupping protocol, and how to read what you taste. We'll also cover budget shortcuts and the errors that ruin most first sessions.
The Essential Coffee Cupping Equipment List
The core kit breaks into five jobs: grind, weigh, heat, hold, and taste. Each tool exists to remove a variable so your sensory analysis reflects the coffee bean quality rather than your setup. Here's the short version of what each one does.
| Tool | Job | What to Look For |
|---|---|---|
| Burr grinder | Even particle size | Conical or flat burrs, medium setting |
| Digital scale | Gram precision | Reads to 0.1 g, tare function |
| Gooseneck kettle | Controlled pour | Variable temp, thin spout |
| Porcelain bowls | Identical vessels | 5-6 oz, matching set |
| Cupping spoon | Consistent slurp | Deep bowl, silver or stainless |
Everything else, from sample trays to scorecards, is a nice-to-have. Start with these five and you have a working cupping table.
The Grinder: Your Most Important Purchase
If you buy one thing well, buy the grinder. A burr grinder crushes beans between two abrasive surfaces for uniform particles. A blade grinder chops and leaves dust mixed with chunks. That dust over-extracts and turns bitter while the chunks under-extract and taste sour, and you can't fix it downstream.
For cupping, you want a medium grind, roughly the texture of coarse sand. Most entry-level conical burr grinders handle this well. The upgrade path is a flat-burr grinder, but for home cupping a solid conical model is plenty.
Scale, Kettle, Bowls, and Spoons
A digital scale gives you gram precision, which matters because cupping relies on a fixed coffee cupping ratio. Eyeballing scoops adds variance you'll taste.
A gooseneck kettle lets you pour a slow, even stream and saturate all the grounds at once. Variable temperature control helps too, since water temperature drives extraction.
For bowls, use matching porcelain bowls of the same size and shape. Mismatched vessels change how heat escapes and how aromas collect. Finally, a cupping spoon with a deep bowl lets you slurp forcefully and spread coffee across your whole palate.
Single Origin Favorites Sample Pack →
Coffee Cupping Protocol: A Step-by-Step Walkthrough
The coffee cupping protocol is a fixed sequence: weigh, grind, pour, wait, break, and taste. Following the same steps every time is what makes results comparable across coffees and across sessions. Here's the full walkthrough.
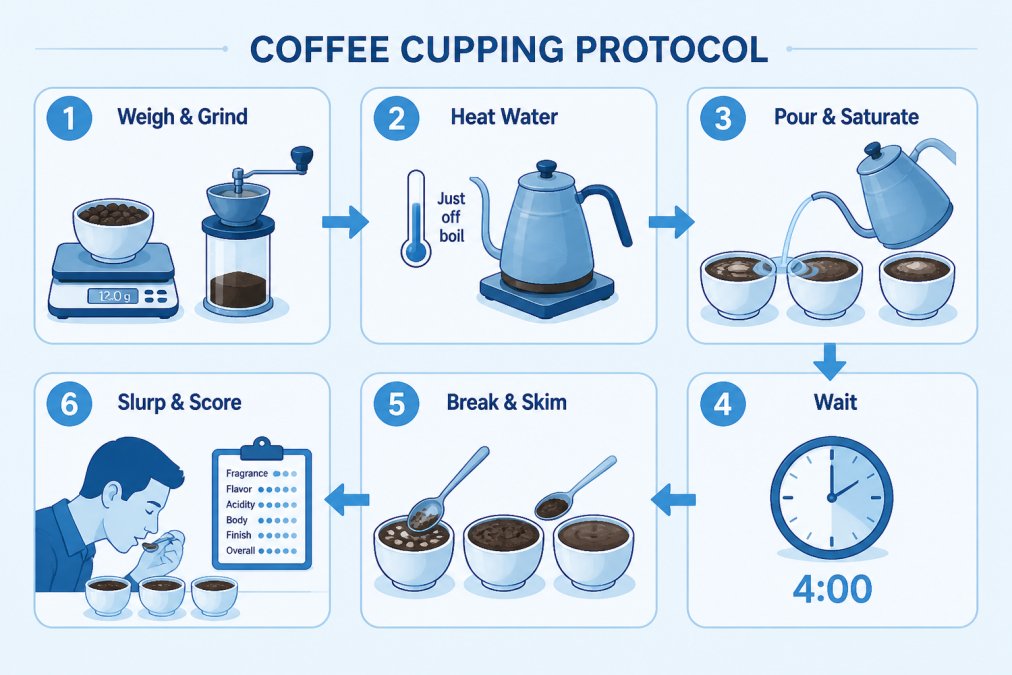
- Weigh your beans. Use the same dose per bowl for every sample, 8.25 grams of coffee to 150 milliliters of water is the standard reference.
- Grind to medium. Do it just before brewing to protect aroma, and purge the grinder between samples.
- Heat water to just off boil. Let it settle for a moment after boiling so you pour at roughly 200-205°F rather than a rolling boil.
- Pour and saturate. Wet all grounds evenly, then top off each bowl to the same line.
- Wait four minutes. Let the crust form and the grounds settle.
- Break the crust. Stir the top three times, then skim the foam.
- Slurp and score. Taste as it cools and note each attribute.
If you want more brewing technique to pair with cupping, our brew guides cover the methods that build on these same skills.
Water Chemistry: The Variable Most Home Cuppers Ignore
Water is over 98% of the cup, yet most home guides treat it as an afterthought. The Specialty Coffee Association publishes a water standard for cupping that targets a total dissolved solids (TDS) range of roughly 75-250 ppm, with hardness (calcium and magnesium) around 50-175 ppm and alkalinity near 40-70 ppm. Those minerals aren't incidental, magnesium binds to fruity and floral compounds and pulls them into the cup, while calcium amplifies body and sweetness.
For home cupping, the practical move is to start with filtered water and, if your tap runs hard or highly alkaline, blend it with low-mineral bottled water or use a remineralizing packet designed for coffee water. A cheap TDS pen gives you a rough read. The goal isn't lab precision, it's removing the variable so your scores reflect the coffee, not your plumbing.
Breaking the Crust: Mechanics and Timing
The four-minute steep isn't arbitrary. It gives soluble compounds a consistent window to release across every bowl, and it lets the crust, the floating cap of grounds and foam, form fully so aromatics concentrate there. When you break the crust, you're releasing that trapped aromatic burst directly toward your nose. Stir three times with the spoon, pushing the grounds down and pulling them up, then skim the foam and floating particles with two spoons or a spoon and a cup.
Watch out: breaking the crust too early (before four minutes) under-extracts the cup and releases aromatics before they've concentrated; breaking too late lets the bed cool unevenly and the crust collapse on its own, which muddies the aroma read. Set a timer and break at the same moment every session.
Slurping and the Temperature Arc
Slurping isn't rude, it's technique. A forceful slurp aerates the coffee and spreads it across the entire palate, including the sides of the tongue and the soft palate where retronasal aromatics register. Taste at three points: hot (right after skimming), warm (a few minutes later), and cool (near room temperature). Sweetness and acidity often emerge as the cup cools, while bitterness and astringency become more obvious. Scoring only when hot hides the finish and the aftertaste, two attributes that separate a good coffee from a great one.
Setting Up a Repeatable Station
A cupping station is a workflow, not a pile of gear. Lay out bowls in a row with a spoon and a spit cup per person, keep a timer visible, and stage hot water in a preheated kettle so every pour hits the same temperature. For group sessions, team tastings, client sampling, or holiday gift events where you're introducing colleagues to specialty coffee, assign one person to pour and one to keep time so the protocol stays synchronized across every bowl. A printed scorecard per taster and a shared water pitcher round out the station. The same setup scales from a solo Saturday morning to a pantry tasting for a dozen people.
Nailing the Coffee Cupping Ratio and Grind
The standard coffee cupping ratio is 8.25 grams of coffee to 150 milliliters of water. That's a fixed reference point, and it's fixed on purpose: change the ratio and you change extraction, which changes what you taste. Keep it constant so only the coffee varies.
Grind matters just as much. Too fine and the bed clogs, slowing extraction and pushing bitterness forward. Too coarse and water runs through, leaving thin, sour cups. Aim for medium and keep it consistent between samples.
Watch out: the most common error here is grinding different samples at different settings. If one coffee tastes brighter than another, you need to know whether that's the bean or your grinder. Same dose, same grind, same water, every time.
Timing Your Coffee Cupping Time for Best Results
Coffee cupping time runs on a clock, not a feeling. The standard window is four minutes of steeping before you break the crust, then a gradual cool-down as you taste. The four-minute steep lets soluble compounds release at a consistent rate across every bowl.
Why does timing matter so much? Because flavor shifts as temperature drops. Aromas read differently hot, warm, and cool. Tasting at several points in the cool-down reveals layers you'd miss in a single sip.
Single Origin Favorites Sample Pack →
Set a timer. Don't guess. And taste the same coffee at two or three temperatures to catch the sweetness and acidity that emerge later.
How to Read a Coffee Cupping Chart
A coffee cupping chart scores the same attributes every time: aroma, acidity, body, sweetness, balance, aftertaste, and cleanliness. Learning to read one turns a pleasant sip into real sensory analysis. You're grading specific qualities, not just deciding whether you like it.
Score each attribute on a simple scale and write down what you notice. Acidity is brightness, not sourness. Body is mouthfeel and weight. Cleanliness means no off-flavors in the finish. A natural-process coffee like our Ethiopia Natural gives you a bold, fruity reference point to compare against a washed coffee.

The chart isn't a verdict. It's a record. Over several sessions, patterns emerge and your palate sharpens.
Budget-Friendly DIY Alternatives and Troubleshooting Common Errors
You don't need a full lab to start. A few swaps keep costs down without wrecking your results.
- No gooseneck kettle? Use any kettle and pour slowly from a mug.
- No cupping spoon? A deep soup spoon works in a pinch.
- No scale? A measuring spoon gets you close, though gram precision suffers.
- No matching bowls? Use identical mugs, but expect slight differences.
Then there are the errors that trip up nearly everyone. Slurping too gently means you miss aromatics. Skipping the skim leaves grounds in every sip. Tasting only when hot hides the finish. And using tap water with strong mineral taste masks flavor clarity, so filtered water is worth the small effort.
Stock Your Cupping Table with Brewtiful Coffee
A great cupping session needs great beans, and that's where we come in. Brewtiful Coffee roasts fresh and ships nationwide, so your samples arrive ready to evaluate. Our Single Origin Favorites Sample Pack gives you six 2-ounce coffees to compare side by side, from Colombia to Tanzania. Setting up a group tasting? The Best Sellers Sample Pack brings six crowd-pleasers to one table. First time ordering? Visit our new customers page to see how it works.


Cupping rewards curiosity, and the right beans make every session worth the effort. Get started with Brewtiful Coffee and taste the difference fresh-roasted, single-origin coffee brings to your table.
Frequently Asked Questions
What tools do you need for coffee cupping at home?
At minimum you need a burr grinder, a digital scale accurate to 0.1 grams, a gooseneck kettle, matching porcelain or glass bowls, a cupping spoon, and a timer. A sample tray and printed scorecard help you stay organized. You can start with four bowls and scale up as you get comfortable with the coffee cupping protocol.
What is the best coffee-to-water ratio for coffee cupping?
The standard coffee cupping ratio is 8.25 grams of coffee to 150 milliliters of water, which works out to roughly 1:18. Weigh each bowl individually on a digital scale rather than scooping by volume. Consistent gram precision is what makes cupping results comparable from session to session, so don't eyeball it.
How hot should the water be and how long should coffee steep during cupping?
Heat water to between 195 and 205 degrees Fahrenheit, just off a boil. Pour enough to saturate all the grounds, start your timer, and let the bowls sit undisturbed for four minutes. At the four-minute mark, break the crust with your spoon and skim the foam before tasting. Total coffee cupping time from pour to first slurp is about five to six minutes.
What should you record on a coffee cupping chart?
A coffee cupping chart should capture aroma, acidity, body, sweetness, flavor notes, aftertaste, balance, and overall impression, usually on a 6 to 10 point scale per attribute. Note the sample name, roast date, and grind setting at the top. Score independently before discussing with others so your palate stays honest.
