

Pour Over Coffee Grind Size for Beginners: 2026 Guide
Table of Contents
- What Pour Over Coffee Is and Why Grind Size Decides Everything
- The Coffee to Water Ratio for Pour Over: Start With the Golden Ratio
- Medium vs Medium-Coarse: Picking Your Pour Over Grind Size
- The Best Burr Grinder for Beginners (and Why Blade Grinders Fail)
- Step-by-Step: Brewing Pour Over Coffee With the Right Grind
- Troubleshooting Pour Over Coffee: Fix Bitter, Sour, and Slow Brews
- Frequently Asked Questions
Last Updated: September 14, 2026
What Pour Over Coffee Is and Why Grind Size Decides Everything
Pour over coffee is a manual brewing method where hot water is poured over ground coffee in a filter, and pour over coffee grind size for beginners is the single variable that decides whether your cup tastes bright and sweet or bitter and muddy. This guide from Brewtiful Coffee US walks you through exactly which grind to use, and why it matters more than the dripper you bought.
Here's the core idea: water extracts flavor from coffee grounds, and the size of those grounds controls how fast that happens. Small particles give up their flavor quickly. Large particles hold onto it. Get the size wrong and you either pull harsh, bitter compounds out of the coffee or leave the good stuff sitting in the filter.
Most beginners treat grind size as an afterthought. That's the mistake. A burr grinder and a five-second adjustment will change your cup more than any upgrade to your beans or equipment. The Specialty Coffee Association's brewing standards exist precisely because particle size and contact time drive extraction, and you can read their guidance at Specialty Coffee Association brewing standards.
Below, we'll cover the exact grind setting for pour over coffee grind size for beginners, how to read your grounds by feel, and how to fix a brew that tastes off.
The Coffee to Water Ratio for Pour Over: Start With the Golden Ratio
The golden ratio for pour over coffee is 1:15 to 1:17, meaning one part coffee to fifteen to seventeen parts water by weight (Exploring “Alternative” Brewing Methods to Drive Sweetness). For a standard mug, that's roughly 20 grams of coffee to 300 to 340 grams of water.
Weigh your coffee. Volume scoops vary wildly, so a kitchen scale removes the guesswork and costs less than a bag of beans.
A starting recipe to dial in from:
- 20 g coffee, medium grind
- 300 g water at 200°F
- Total brew time: 2:30 to 3:30
Once the ratio is locked, grind size becomes the only lever you adjust. Change one thing at a time or you'll never know what fixed it.
Medium vs Medium-Coarse: Picking Your Pour Over Grind Size
For most pour over brewers, medium to medium-coarse is the right grind size. Medium looks like coarse sand and works for cone drippers with a single paper filter. Medium-coarse resembles sea salt and suits flat-bottom brewers and larger batches.
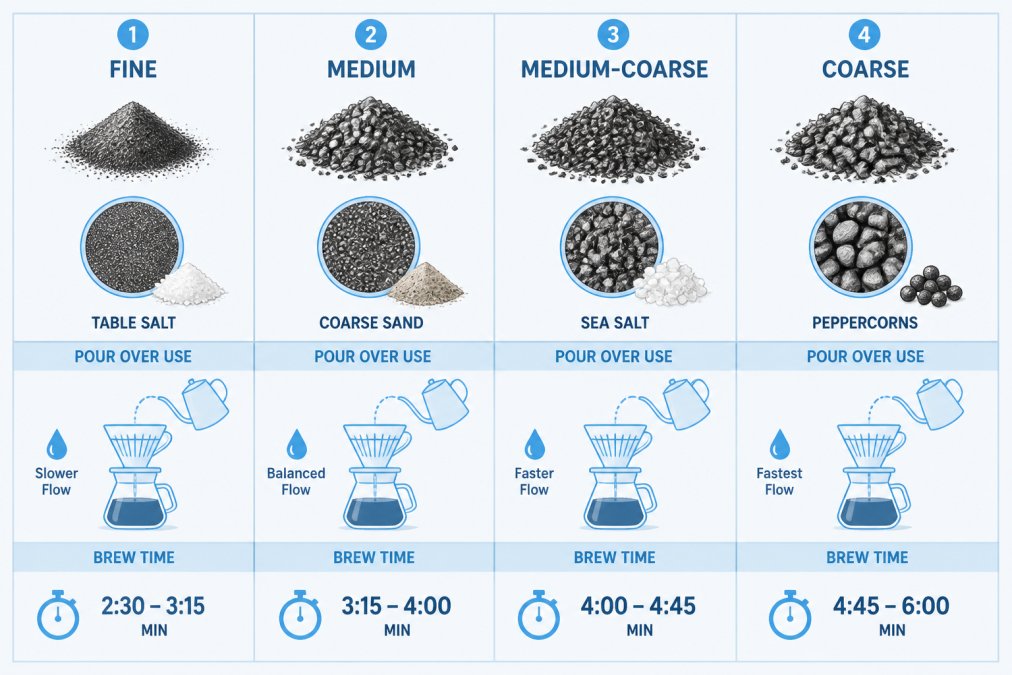
The right answer depends on your brewer and your filter. Thin paper filters drain fast, so they tolerate a slightly finer grind. Thick filters slow the flow, so go coarser. A cone dripper with a bleached paper filter typically wants a grind at the finer end of medium, while a flat-bottom brewer with a thicker filter usually wants medium-coarse to keep the bed from stalling.
Visual Grind Size Reference: Fines, Boulders, and Everything Between
You don't need a lab sieve to judge particle size. Rub a pinch between your fingers and compare it to what's in your kitchen:
- Fines: powder-like, like flour. Too many cause bitterness and clogged filters.
- Medium: gritty, like coarse sand. Your default starting point.
- Medium-coarse: like sea salt. Good for flat-bottom brewers.
- Boulders: like peppercorns. Usually too coarse for pour over.
A common mistake is chasing a single "correct" setting. Every grinder numbers its settings differently, so the number on yours means nothing on someone else's.
Grinder Calibration for Beginners: Finding Your Zero Point
Before you can dial in a grind, you need to know where your grinder's burrs actually touch. That reference point is called the zero point, and most entry-level burr grinders don't mark it clearly.
Here's the process most practitioners use:
- Empty the hopper and run the grinder until no beans remain.
- Turn the adjustment dial toward the finest setting while the grinder is running, listening for the pitch to change. The moment the burrs begin to chirp or the motor strains is your zero point.
- Back off two to three clicks or numbers from that point. That's your true finest usable setting.
- Count from zero, not from the number printed on the dial. A setting of "12" on one grinder may sit at a completely different burr gap than "12" on another.
Once you know your zero point, write down the setting that produces a medium grind for your dripper. That number becomes your baseline, and every future adjustment is a known number of clicks coarser or finer from it.
How Roast Level Changes Your Grind Setting
Darker roasts are more soluble and brittle, so they extract faster and often need a slightly coarser grind. Lighter roasts are denser and resist extraction, so they usually want a finer setting or hotter water.
If you brew a light single-origin and a dark roast on the same setting, expect different results. Adjust the grind, not the ratio.
A practical starting pattern for beginners:
- Light roast: one to two clicks finer than your medium baseline, water at 200°F to 205°F.
- Medium roast: your baseline medium setting, water at 198°F to 202°F.
- Dark roast: one click coarser than baseline, water at 195°F to 200°F.
These are starting points, not rules. Taste is the final judge.
The Best Burr Grinder for Beginners (and Why Blade Grinders Fail)
A burr grinder is the best grinder for beginners because it crushes beans to a consistent particle size, while a blade grinder chops them into a mix of dust and chunks. That inconsistency is why blade-ground coffee tastes both bitter and sour at once.
Burr grinders come in two styles: conical and flat. Conical burrs are quieter and cheaper; flat burrs produce a more uniform grind and cost more. For pour over, either works.
What to look for:
| Feature | Why It Matters | Beginner Pick |
|---|---|---|
| Burr type | Consistent particle size | Conical burr |
| Adjustability | Dialing in grind | Stepped or stepless |
| Capacity | Batch size | 40 g or more |
| Price | Budget fit | Entry-level electric |
The thing nobody tells you about grinders: the grinder matters more than the brewer. A $30 dripper with a good burr grinder beats a $200 brewer with a blade grinder every time.
Step-by-Step: Brewing Pour Over Coffee With the Right Grind
Follow these steps and you'll brew a clean, sweet cup on your first or second try. Total time: about 5 minutes.
What you'll need: burr grinder, pour over dripper, paper filter, kitchen scale, gooseneck kettle, 20 g coffee, 300 g water.
- Heat your water to 200°F. [Time: 2 minutes]
- Weigh and grind 20 g of coffee to a medium setting. [Time: 30 seconds]
- Rinse the filter with hot water, then discard the rinse water. This removes paper taste and preheats the dripper.
- Add the grounds and level the bed by gently shaking the dripper.
- Bloom the coffee: pour 40 g of water, wait 30 seconds. The bed will puff and bubble as trapped gas escapes.
- Pour in circles, working from the center outward, in three stages until you hit 300 g total. [Time: 2 minutes]
- Let it draw down completely. Total brew time should land between 2:30 and 3:30.
Expected result: a flat coffee bed and a total brew time near 3 minutes. If your bed looks like a crater, your pour was too aggressive.
Troubleshooting Pour Over Coffee: Fix Bitter, Sour, and Slow Brews
Most pour over problems trace back to grind size, water temperature, or pour technique. The trick is to diagnose in the right order instead of changing everything at once.
The Diagnostic Order
Work through these four checks in sequence. Stop as soon as the cup improves.
- Taste the cup. Bitter or dry means over-extracted. Sour, salty, or thin means under-extracted.
- Check the brew time. If it's outside 2:30 to 3:30, the grind is the likely culprit.
- Check the bed. A flat, even bed means an even pour. A crater or a muddy slurry means the pour or the grind is off.
- Check the water temperature. Only after the first three are ruled out.
Bitter Coffee: Over-Extraction
Bitterness comes from extracting compounds past the point of pleasantness. The water stayed in contact with the grounds too long, or the grind was too fine and exposed too much surface area.
Fix: Coarsen the grind by one click and shorten the brew time by 15 to 30 seconds. If the brew was already fast, the problem is more likely water temperature, drop it by 5°F.
Sour Coffee: Under-Extraction
Sourness means the water moved through too fast to pull out sweetness. The grind is too coarse, the water is too cool, or the pour was too gentle to agitate the bed.
Fix: Go one click finer, then check that your water is at least 195°F. If the grind is already fine and the water is hot, pour with more agitation, a faster, higher pour increases extraction.
Slow Drain: Too Fine or Too Many Fines
If the brew stalls and takes more than four minutes, the grind is too fine or your grinder is producing an excess of fines that clog the filter.
Fix: Coarsen the grind. If the problem persists at a coarse setting, your burrs may be worn or your grinder may be a blade model producing inconsistent particles. A burr grinder upgrade is the real fix.
Fast Drain: Too Coarse or Too Gentle
If the brew finishes in under two minutes, the grind is too coarse or your pour was too gentle to keep the bed saturated.
Fix: Go finer and pour with a bit more agitation. If the bed looks like a crater, your pour was too aggressive in the center and too light at the edges, pour in slow, even circles from the center outward.
Water Temperature: The Grind's Silent Partner
Water temperature and grind size work together. A fine grind extracts quickly, so it needs cooler water to avoid over-extraction. A coarse grind extracts slowly, so it needs hotter water to reach the same flavor.
Aim for 195°F to 205°F (How Hot is Hot Enough? Brew Temperature, Sensory Profile, and Consumer Acceptance of...). Water that's too cool under-extracts even a perfect grind, while water at a rolling boil can scorch the grounds and add a flat, papery taste.
A Quick Reference for Common Symptoms
| Symptom | Likely Cause | First Fix |
|---|---|---|
| Bitter, dry | Over-extracted | Coarsen grind |
| Sour, thin | Under-extracted | Finer grind, hotter water |
| Slow drain | Too fine or too many fines | Coarsen grind |
| Fast drain | Too coarse or gentle pour | Finer grind, more agitation |
| Muddy bed | Too many fines | Check grinder burrs |
| Crater bed | Uneven pour | Pour in slower circles |
Frequently Asked Questions
How do I know if my coffee grind is too coarse or too fine?
Taste and brew time tell you. If your pour over drains in under 2 minutes and tastes sour or thin, the grind is too coarse. If it stalls past 4 minutes and tastes bitter or harsh, it is too fine. For pour over grind size, aim for a total brew time of 2:30 to 3:30. Adjust your grinder one click finer or coarser at a time, and change only one variable per brew so you can actually taste what shifted.
What is the golden ratio for coffee pour over?
The golden ratio for pour over is roughly 1:15 to 1:17, meaning 1 gram of coffee to 15-17 grams of water. A common starting point is 15 grams of coffee to 250 grams of water, which yields about one 8-ounce cup. If the cup tastes weak, tighten toward 1:15. If it tastes heavy or bitter, loosen toward 1:17. Weigh your coffee and water on a scale rather than using scoops.
Does grind size affect coffee bitterness?
Yes, more than almost any other variable. Finer particles expose more surface area, so water pulls out compounds faster. Push too fine and you extract bitter, drying compounds along with the good ones. Too coarse and you get sour, under-extracted flavors instead. Grind size is the fastest lever you have for fixing bitterness, which is why nailing your pour over grind matters before you tinker with water temperature or ratio.
How many tablespoons of ground coffee for a 12 oz pour over?
For a 12-ounce pour over, start with about 22 grams of coffee, which is roughly 3 tablespoons of whole beans ground fresh. Pair that with 340 grams of water, close to a 1:15 ratio. Tablespoon measurements vary with grind coarseness and bean density, so a $15 kitchen scale will improve your consistency far more than any scoop. Once you find a ratio you like, write it down and repeat it.